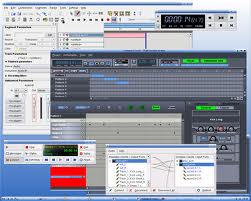
 I came across by chance in what I consider one of the more comprehensive guide to creating audio in Linux, and Stefano gave me the permission to republish his material that I consider really good and that he uses as musician.
Stefano it’s an Ubuntu user and his guide it’s based on this distribution, he’s really active in the Ubuntu italian community, if you want to make him a question regarding his guide, you can post in this thread http://forum.ubuntu-it.org/index.php/topic,278719.0.html, the language of the forum is Italian, but i’m sure that you’ll get some answers also if you ask kindly in English.
You can find part 1 of this tutorial here and part 2 here
This is part 3, i plan to republish the last part in a few days.
The original article is in italian, you can send note about the Translation to me.
11. Ardour, Rosegarden, Hydrogen
The heart of it all is Jack, as I said. But the vital organs are of course the drum machine (Hydrogen), the MIDI sequencer (Rosegarden) and the multi-track audio recorder (Ardour).
Start up all three, after starting of course Jack.
In each we are going to choose Jack as the transport, so that the three programs go together, as if they were a single program.
Ardour : In the top right next to the timer, above “Time Master “, choose “Jack”
Rosegarden: Settings → Configure Rosegarden … “→ General → Behaviour. Check “Use the transport Jack. ”
NB: In some systems it seems that Rosegarden does not start, but just remove the 3D effects (compiz) and you’ll see that in fact it’s there. To enable and disable compiz on the fly i recommend using fusion-icon (see Chapter 1 Preparation)
Hydrogen: File → Preferences → Sound system. Under “Audio Driver”choose “Jack”.
Pressing play in any program and the other will start.
Remember to change the metronome in all three programs, since the synchronizationis is done only for the play/stop/pause, not for anything else.
At this point you just have to study the programs we use.
Rosegarden: http://www.rosegardenmusic.com/resources/
Ardour: http://www.wguitars.it/ardour.php. Another good manual (in english)that takes you by the hand in the construction of an entire song, covering all thefeatures of Ardour is here: http://en.flossmanuals.net/ardour/
Hydrogen: http://www.hydrogen-music.org/?p=docs
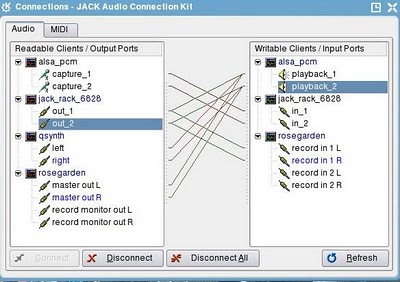
Finally, if you do not use Ardour, at this point you can also click on “Connect” to connect and have fun in Jack instruments. You can do this even if you use Ardour but having an internal management of jack in Ardour you can do it from there (it’s faster) and graphically display what you have done by pressing the “Connect” on Jack.
In this bizarre example I connected the microphone (Capture alsa_pcm) to JackRack, that is, in essence, I said to connect the socket of my soundcard (it is attached to my electric guitar) to the Jack Rack, where there are a series of distortions, then I connected the output of Jack Rack to register at Rosegarden and to the speakers (to hear live what I’m playing). I also connected Qsynth to the speakers (so I hear the sounds of MIDI tracks) and of course the output of Rosegarden to speakers to hear the final result. It is just an example, I could do many other things I could send the output of Rosegarden record monitor output to the speakers instead of Jack Rack, I could bring into the sound card the output of my Korg and connect directly to speakers et cetera. The combinations are endless and are all to be tested.
12. Arranging with gmorgan
Gmorgan allows us to test our first song before to build the base from scratch. It resembles, in miniature, a Band in a Box (but is not free, for Windows, also works on Ubuntu through wine, see Appendix B). That has two functions:
– decide the style (jazz, country, dance, whatever you want), connect a MIDI keyboard to your computer, and while we play chords with our left hand, with our right hand we plays the solo instrument. Gmorgan change chords while we play for the other instruments: guitar, bass, piano …
– for each beat of the song, we say with what style and what chord do. We tell it where anf if repeat, when making a change (for example, a break or a fill, or a final, or an intro) and he executes it diligently. If we like the result, we can export as MIDI.
12.1 – Configuration
The first time you start gmorgan, it should tell you some things, otherwise it will not work.
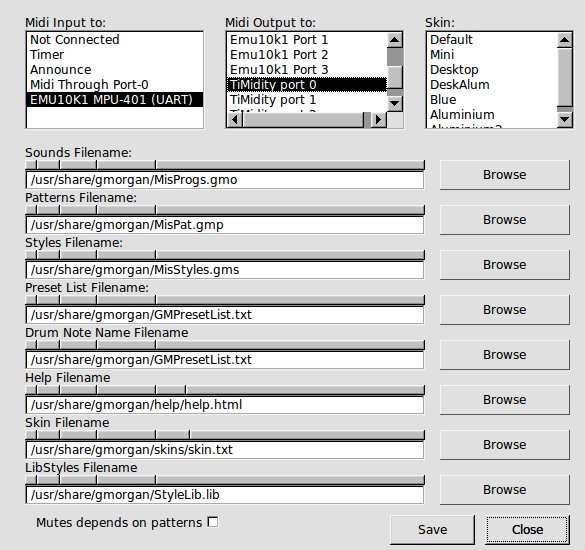
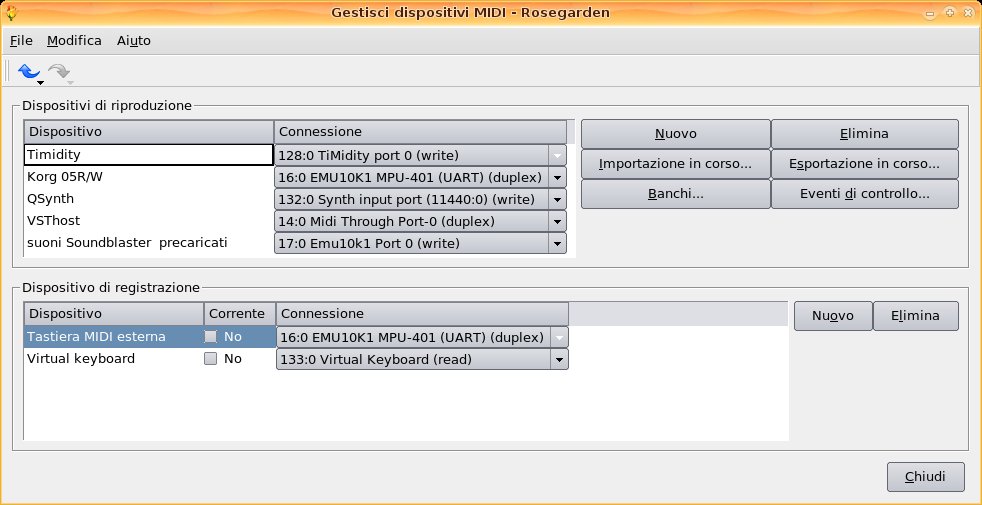
Start it and go to Settings → Global. You will get a screen that should be configured like this:
(If you do not see it well, click on it to make it bigger).
There where you see the selected “Timidity 0 “, you can choose what you want: Qsynth, a rack outside, the wavetable …
Click “Save” and restart gmorgan.
12.2 – Usage
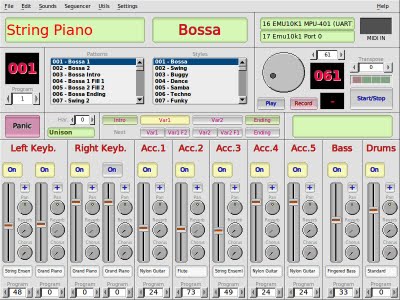
At this point you will be presented with this screen:
Select from the list on the right the style you want (on the left there are variations of that style) and press “Start/Stop”. You will hear that the orchestra begins to play. If you are connected with a MIDI keyboard, you can now make a chord with the left hand, and magically gmorgan shift the pitch of the song on that chord, and all instruments will follow that. In the meantime you can do a solo with the right hand. And is immediately piano bar! ^ _ ^
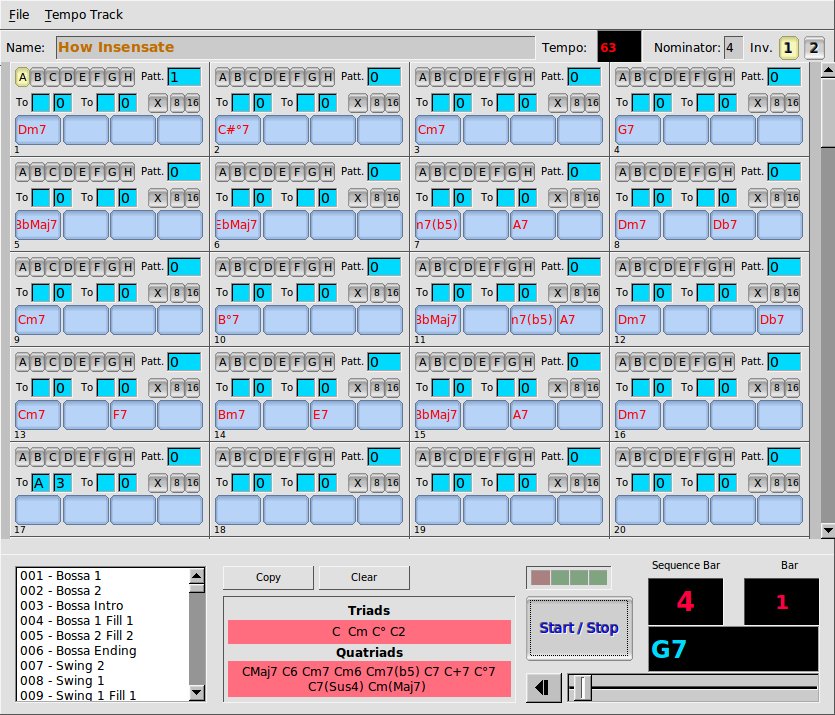
Now that you have had some fun and have found the right style for your song, stop it pressing the “Start/Stop” button and in the menu, press “Sequencer”. There you can put the chords (each square is one fourth of the bar) and style (the number in the upper right of each bar corresponds to a style, a list of which is on the lower left). You can also tell it where to repeat and even where to go back, and where to stop. If you do not write anything the chord is made with the previous style. Press “Start/Stop” to listen your creation. Is better understood with an example:
Here you will find more detailed instructions: http://gmorgan.sourceforge.net/doc.html
In particular, with regard to the sequencer: http://gmorgan.sourceforge.net/doc.html#III.H%20-The%20Sequencer%20Song|outline
Once the draft of the song is finished, you can export it in the sequencer, on “File” → “Export MIDIfile”. Now you can import it in Rosegarden to change it as you prefer, to make it more beautiful and more varied and to suit your needs.
13. Producing our song
Now that we have set up Rosegarden, Ardour and Hydrogen, and we know how to import and export, we can begin to record our song.
Open them, in this order:
– Jack Control. Press Start and make sure it is active.
– Qsynth. Check that the soundfont is loaded. Turn off reverb and chorus.
– If necessary, you can load other Qsynth with other soundfont, memory permitting.
– Hydrogen
– Rosegarden
– Ardour
13.1 – Setting up the project
First, it is necessary to fix the metronome and of the time of the song, otherwise every software will go on his own without synchrony.
Rosegarden:
– Position yourself at the beginning of the song and press “Edit” → “Open the editor of time and meter. ”
– Double click on the line “rhythm. ” Change it at your leisure. The same for the time.You can always change them in the future, and modify them at any subsequentchanges to the metronome inside the song.
Ardour:
– On the track “master”, if you notice, there are several lines: Timecode, Meter, Time …
– Right Clicking on “4/4” and choose “Edit” you can change it at your leisure.
– Same for the metronome.
Hydrogen:
The metronome of Hydrogen is in plain view in the player, just click on it.
At this point it’s best to compose a small base with Hydrogen battery. Just a time basis, you are going to change it as the song will proceed.
To make the best use of Hydrogen, read carefully the guide and tutorial.
13.2 – Set the musical instruments
On Rosegarden:
– If you want to use only the soundfont, see paragraph 13.3. If you want to connect multiple MIDI machine, proceed with the reading of these instructions:
– “Studio” → “Manage MIDI devices”.
– Pressing the pull-down menu in the “Connection” under “General MIDI Device” you’ll get a bit of all the instruments you have.
– If for example you have an external module connected via MIDI to a SoundBlaster card, you will set the output to “Emu10k1 MPU-401”. If you have Timidity, it will set up to Timidity. If you have pre-loaded the Creative SoundBlaster soundfont via asfxload, set “Emu10k1 Port 0 “. If you use soundfonts with Qsynth, set “Synth input port”.
– You can also choose more than one instrument, using the following “out 2 “, “Out 3 ” and so forth, changing their name.
– As a recording device, if not hand-typed MIDI notes but you use an external keyboard connected via MIDI, you can choose MPU-401. If you use the “Virtual MIDI Keyboard” (you can find it in the repositories) will set that.
– If you have an external module (rack or keyboard that is) that acts as MIDI orchestra, under “Playback Devices” select that device and press “banks”. In the list, select that device and press “Import current”.
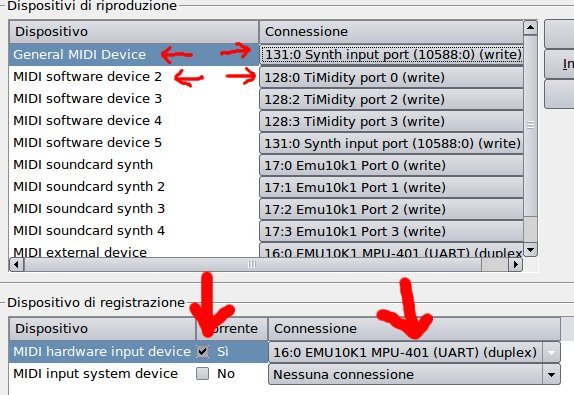
Here’s another example:
As you can see, in this example between the various output i have two devices (or MIDI machines) I use:
1) “General MIDI device” connected to the device Qsynth
2) “MIDI software device 2 ‘is connected to the device Timidity
And between the inputs I have:
1) “MIDI hardware input device” connected to the cable MIDI IN, which to me is called “EMU10K1 MPU-401” but i do not know how it’s called on your system it depends on your MIDI tab.
2) There is also the possibility of having a software input (for example, a virtual keyboard drawn on the screen) but in the example I have not turned it on.
13.3 – Assign multiple instances of Qsynth
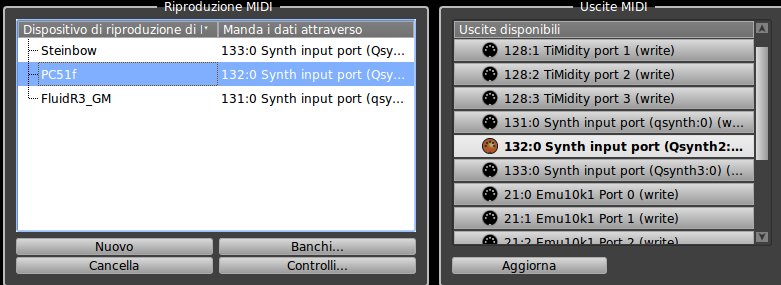
If you have multiple instances of Qsynth (see Section 7.2), i’ll show you an example where I have uploaded three instances of Qsynth, each with different soundfonts:
QSynth1 → FluidR3_GM.sf2
QSynth2 → PC51f.sf2
QSynth3 → steinbow_mg.SF2 (excellent soundfont piano with only four instruments)
Change the name and/or add playback devices, assigning a name corresponding to the correct output, like this:
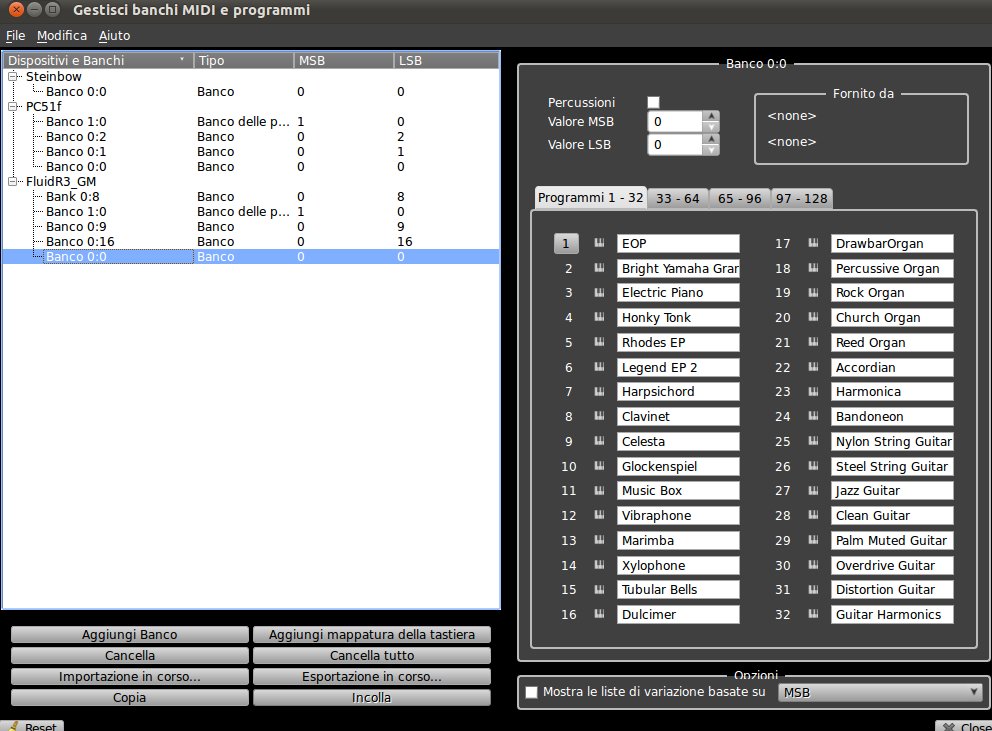
– Click on “banks …”
– Go to FluidR3_GM and click on “Import in progress …”
– In the path select /usr/share/sounds/sf2
– In the “Files of type” select “Sources of sound (*.sf2 *.SF2)”
– Click on FluidR3_GM.sf2 and then choose Open, and then click OK
– Do the same for PC51f and Steinbow, with their soundfonts.
You should now have a screen like this:
Close and go to the main window of Rosegarden.
Give to each track the name of the soundfont and the name of the instrument, as reminder, in the next section we’ll see how to assign instruments to tracks.
13.4 – Assignment of MIDI instruments and devices
On Rosegarden, now assigns the instruments:
– right click on the various “Untitled” → choose the device and the MIDI channel for that track
– in the bottom left of the “Parameters of the instrument” you may choose the bank but mainly the instrument.
– To use a DSSI synthesizer (for example, Hexter, who is an emulator of Yamaha DX-7), just choose the device as “the synthesizer module”. Under “Module” you can choose what you want.
– On the left, in the main window of Rosegarden, on “parameters of the instrument” , press the first “no module” to add effects (and other cascading effects on other “no module”). By clicking on Editor you can choose the preset you want.
Keep in mind that you can have more MIDI devices and each device has more instruments, usually a hundred, or more than 100 but divided into banks. Each device typically has a maximum of 16 channels. To Each channel it can be assigned only a single instrument.
Some are hardware devices: they are connected via USB or via MIDI and can be a synthesizer keyboard, a Rack module type Sound Canvas, and so on. Others are software Qsynth, timidity, or soundblaster wavetable, VST sound module … Each of them has probably at least a bank of sounds called “GM”, ie corresponding to a standard that is playing “good” the midi bases. Some, however, have only 1 bank and 1 instrument, these simulators are generally a single instrument, very well done, which takes up all the memory that could hold all the other instruments together.
For example:
Device: Korg X3
Channels: 16
Banks: 2
Instruments: Piano (Bank 1, preset 1), Bass guitar (Bank 1, preset 12), Atmosphere (bank 2, preset 1) and 200 others. The bank 1 is a GM, the other bank is made of new instruments only Korg.
Device: Qsynth with soundfont PC51f
Channels: 16
Banks: 1
Instruments: all instruments GM (1: Piano, 2: Piano bright, etc.)
Device: QSynth2 with soundfont steinbow_mg.SF2
Channels: 1
Banks: 1
Instrument: Piano Stainway multisampled (preset 1), bright Stainway plan (preset 2), Stainway floor saloon (preset 3), electric piano Stainway (preset 4)
Device: Timidity
Channels: 16
Banks: 1
Tools: all sounds GM
Device: Synthesizer Module
Channels: 24
Classroom: all synths that have installed
Tools: a tot for each synthesizer.
etc.
The nice thing is that we can give each track an instrument from among the various instruments connected devices, and assign a MIDI channel.
Let’s see a practical example.
I Describe now a practical example: it seems that the bass from Qsynth is better. Then right click, and choose Qsynth and a channel at random (from the first. The only difference: if it’s the battery, by convention, always take the channel 10), then go left on the “parameters of the instrument” and choose the bass on the pulldown menu. For example I have a beautiful sound of piano in Korg, in non-GM bank of sounds, then right click on the “Untitled” on the piano, I select the Korg, I put it on the first channel, and then on the left as I choose the bank’s owner and as a instrument i choose “Piano 16 “.
Of course, if using multiple instruments of the same MIDI machine, you’ll assign several MIDI channels. For example, Korg machine , bass on channel 1, piano on channel 2, and so on. Machine Qsynth, violins on channel 1, saxophone on channel 2 , drums on channel 10. Eye because the MIDI channels are usually not exceeding 16 per machine.
In reality it is much less complicated than it seems. And above all, makes you finally understand the usefulness of “MIDI through” on the function of which – I’m sure – you have thought for years. 🙂
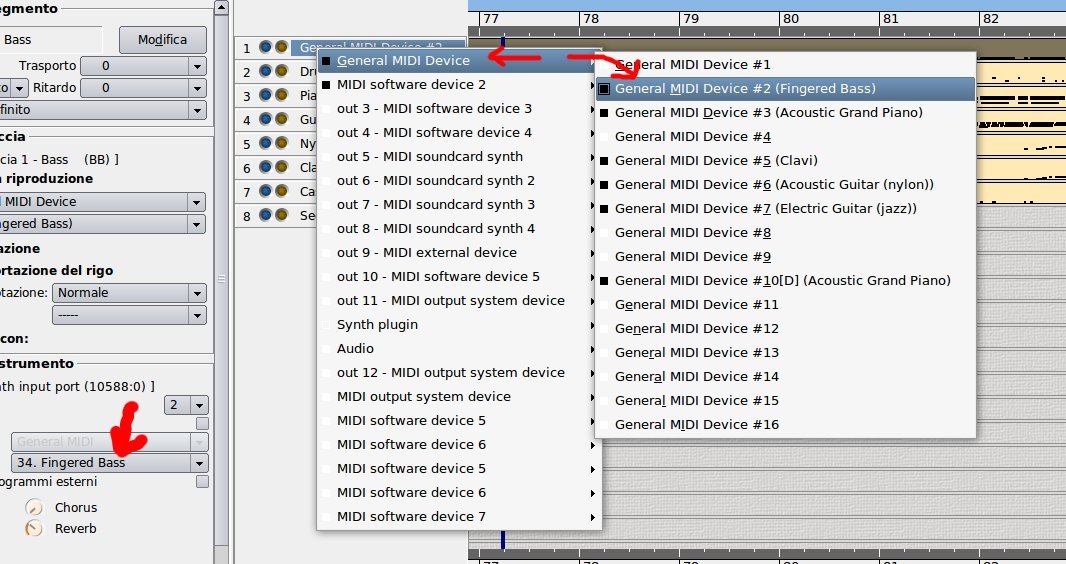
In this example, I right click on the first track, which I want to assign the tool “Bass guitar” from the Qsynth device. So I chose first the device “General MIDI Device” (which, as you have seen before in the last example, is connected to Qsynth) and then I told him to use the electric bass as an instrument, which is number 34 on the MIDI channel #2 (as you know, each device usually has 16 MIDI channels).
Then I go with another instrument, eg piano, but I want it from Timidity and not from Qsynth:
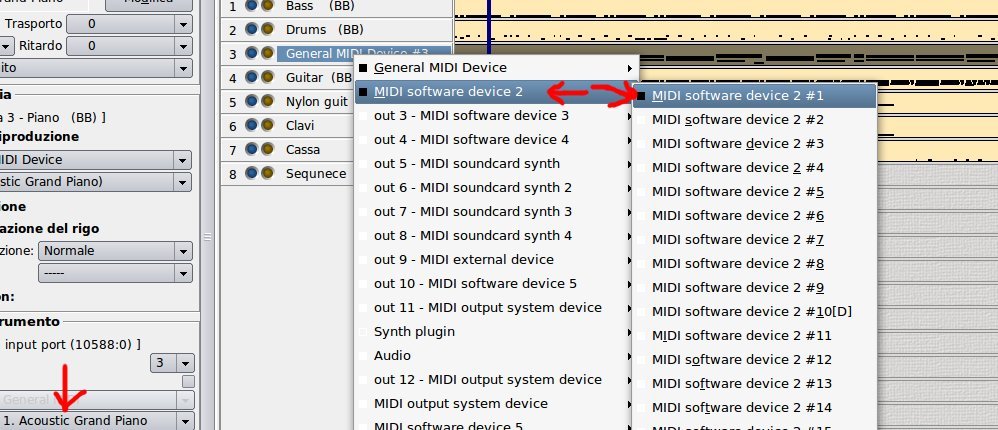
As you can see, I clicked with the right on the track of the piano (third from top), I chose the device as “MIDI software device 2 ” (it is connected to Timidity, you can see the example two screens above) and as an instrument piano, which is the instrument #1. I put it on the first of the 16 available channels.
If we now click on recording of a track (on each track there are two circles: the second enables recording), without actually press the record/play, you enable the “live” sound. That is, if you select recording of the first track of the example and you have a MIDI keyboard connected to your PC, playing with the keyboard you will hear the sound of the bass on Qsynth. If, you enabled the recording of the third track of my example, play your keyboard to hear the sound of the piano from Timidity.
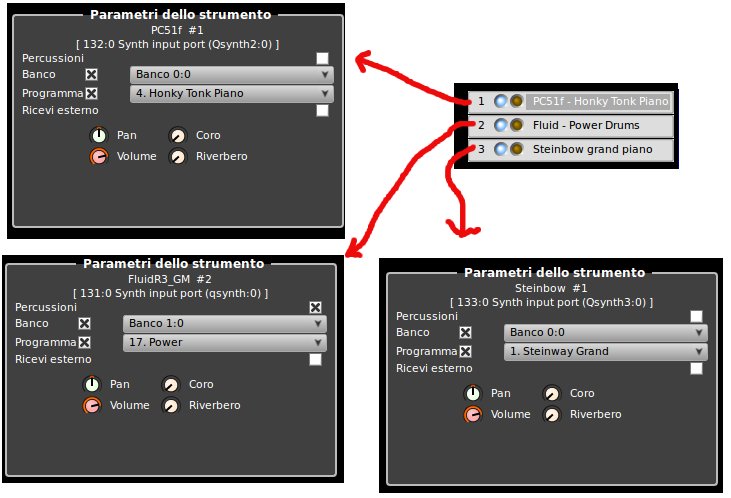
Returning to the example of paragraph 13.3, we could have something like this:
This is the End of Part 3 of this guide on how to produce Music with Linux, stay tuned for the last part.
And thanks once again to Stefano Droghetti for this guide.
[amazon_enhanced asin=”1886411344″ price=”All” background_color=”332610″ link_color=”FFFFFF” text_color=”D4CE99″ /]
[amazon_enhanced asin=”1593272707″ price=”All” background_color=”332610″ link_color=”FFFFFF” text_color=”D4CE99″ /]
Popular Posts:
- None Found


Thanks a lot! Very useful for noobs like me. Waiting impatiently for the last part. My gratitude to Stefano Droghetti, the author. He should write a book! Seriously, a lot of people would want to read it to begin making music on linux.