Today i want to show you some examples done with Zenity.
Zenity is a cross-platform program that allows the execution of GTK+ dialog boxes in command-line and shell scripts.
Like tools such as whiptail and dialog, zenity allows for easy creation of GUIs, though it has fewer features than more complex GUI creation tools: “Other scripting languages such as Perl and Python can be used to construct full-scale GUI applications, but the zenity program enables a shell script to interact with a GUI user…. [The] user interface is not as refined as one that could be provided by a full-featured GUI application, but it is perfectly suitable for simple interactions.”
Basic Usage
When you write scripts, you can use Zenity to create simple dialogs that interact graphically with the user, as follows:
- You can create a dialog to obtain information from the user. For example, you can prompt the user to select a date from a calendar dialog, or to select a file from a file selection dialog.
- You can create a dialog to provide the user with information. For example, you can use a progress dialog to indicate the current status of an operation, or use a warning message dialog to alert the user.
When the user closes the dialog, Zenity prints the text produced by the dialog to standard output.
Message Box
Zenity can create four types of message dialog:
- Error
- Information
- Question
- Warning
For each type, use the –text option to specify the text that is displayed in the dialog.
Examples:
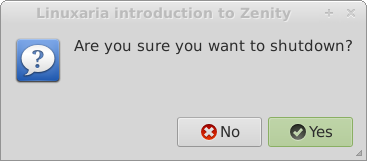
Bring up a request with a question:
zenity --question --title="Linuxaria introduction to Zenity" --text "Are you sure you want to shutdown?" |
Entry Dialog
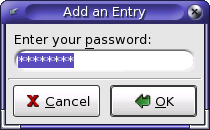
Use the –entry option to create a text entry dialog. Zenity returns the contents of the text entry to standard output.
The text entry dialog supports the following options:
–text=text
Specifies the text that is displayed in the text entry dialog.
–entry-text=text
Specifies the text that is displayed in the entry field of the text entry dialog.
–hide-text
Hides the text in the entry field of the text entry dialog.
Example
#!/bin/sh if zenity --entry --title="Add an Entry" --text="Enter your password:" --entry-text "password" --hide-text then echo $? else echo "No password entered" fi |
Text Entry Dialog
Use the –entry option to create a text entry dialog. Zenity returns the contents of the text entry to standard output.
The text entry dialog supports the following options:
–text=text
Specifies the text that is displayed in the text entry dialog.
–entry-text=text
Specifies the text that is displayed in the entry field of the text entry dialog.
–hide-text
Hides the text in the entry field of the text entry dialog.
#!/bin/sh if zenity --entry --title="Add an Entry" --text="Enter your _password:" --entry-text "password" --hide-text then echo $? else echo "No password entered" fi |
Progress Dialog
Progress dialog is to track a progression of a routine.
Zenity reads data from standard input line by line. If a line is prefixed with #, the text is updated with the text on that line. If a line contains only a number, the percentage is updated with that number.
The progress dialog supports the following options:
–text=text
Specifies the text that is displayed in the progress dialog.
–percentage=percentage
Specifies the initial percentage that is set in the progress dialog.
–auto-close
Closes the progress dialog when 100% has been reached.
–pulsate
Specifies that the progress bar pulsates until an EOF character is read from standard input.
File Selection dialog
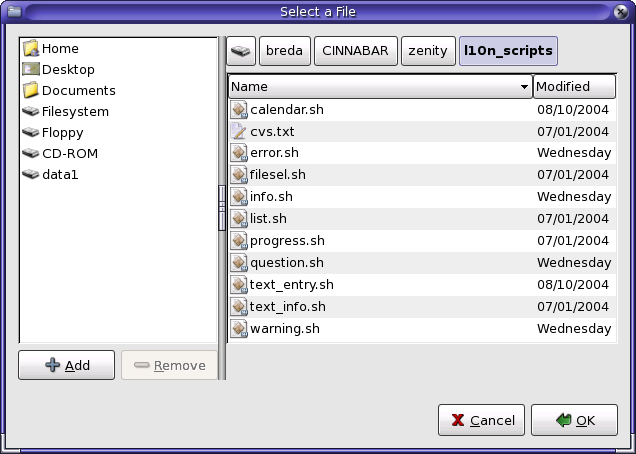
File selection dialog is one of the a very useful zenity dialog, it support open file or save file dialog.
Use the –file-selection option to create a file selection dialog. Zenity returns the selected files or directories to standard output. The default mode of the file selection dialog is open.
The file selection dialog supports the following options:
–filename=filename
Specifies the file or directory that is selected in the file selection dialog when the dialog is first shown.
–multiple
Allows the selection of multiple filenames in the file selection dialog.
–directory
Allows only selection of directories in the file selection dialog.
–save
Set the file selection dialog into save mode.
–separator=separator
Specifies the string that is used to divide the returned list of filenames.
#!/bin/sh FILE=`zenity --file-selection --title="Select a File"` case $? in 0) echo ""$FILE" selected.";; 1) echo "No file selected.";; -1) echo "No file selected.";; esac |
More examples:
Run your program with a parameter
Sometimes you always run a program with the need of choosing a file to be opened, so why don’t have a box that request it ?
mousepad $(zenity --file-selection) |
Google Chrome profile selector
Simple Google Chrome profile manager using zenity for profile name input. Place this in a shell script and then use the path to it as the command field in a gnome/kde shortcut. When you start it you will be prompted for a profile to use, if you leave it blank you should get the default profile.
/opt/google/chrome/google-chrome --user-data-dir=$HOME/.config/google-chrome/`zenity --entry --text="Enter a profile name:"` |
Shutdown Box
Do you want to implement your own shutdown button ?
Just use something like this (we use the question option and check if the user has pushed on the Ok).
#!/bin/sh # Say bye to shutdown your pc #uses zenity to ask first. zenity --question --title "Shutdown Confirmation" --text "Are you sure you want to shutdown?" if [ "$?" -eq "0" ] then # Do shutdown at here. #Ubuntu probably needs gksudo instead of sudo sudo init 0; fi |
Simple text editor
Another great example found on http://www.tildehash.com/?article=advanced-application-shortcuts-with-zenity
This example displays a file browsing dialog from which you can select a file to edit, it then opens a text box window where you may type or paste text, when you hit “Close” another file browsing dialog is displayed where you can select the file you’d like to save your modifications to, it can be the original file, a different file, or a non-existent file.
#!/bin/bash zOpenPath="$(zenity --file-selection)" if [ "$zOpenPath" != "" ] then zData=$(cat "$zOpenPath") zNewData=$(echo -n "$zData" | zenity --text-info --editable --width 650 --height 400) zSavePath=$(echo -n "$(zenity --file-selection --filename="$zOpenPath" --save --confirm-overwrite)") echo -n "$zNewData" > "$zSavePath" fi |
References:
Zenity Site: http://library.gnome.org/users/zenity/
Advanced application launcher with Zenity: http://www.tildehash.com/?article=advanced-application-shortcuts-with-zenity
Popular Posts:
- None Found


Hi,
I like the GTK Theme of the two first screenshots (where there are the – + x buttons on the top right corner). Can you please give me the name of that theme?
Thanks
It seems that zenity is no longer developed.
Better to practice with yad instead:
http://code.google.com/p/yad/
latest debian binary:
http://www.bollati.info/kaspar/yad_0.9.0-1_i386.deb
Innocent i use Xubuntu 10.10, and i use the default theme 😉
kasper, thanks for the tip i’ll check that for sure
Great article! I’ve been hooked on Zenity lately, so I really find this stuff useful.
By the way, why aren’t the URLs for Zenity’s website and the one for my “Advanced Application Launchers With Zenity” article not hyperlinks? Most people don’t want to copy and paste 🙂
Thanks Jacob.
Links fixed 😉
Hi Linuxari.
Thanks by the post, I’m a beginner in shell, just used dialog in shell scripts, and I’d like zenity ways, and yours exampĺes words fine, I have learn a lot here today,
TKY very much!!
Até a Próxima
Edson / Brazil.