Article by Jay Turla first published on infosecinstitute
A lot of sniffers, rootkits, botnets, backdoor shells and malwares are still on the wild today, which are used by malicious attackers after successfully pawning a certain server or any live network in order to maintain their access, elevate their access privilege, and spy other users in a network. In order to protect our network or server from such intrusions and further damage, there are free and open source detection tools that can be deployed and used as part of our security strategy. They are mandatory when our server or network is up and running, especially if a certain user is downloading a file which could possibly be malicious or harmful.
The advantage of using free and open source detection tools is that you obviously don’t need to pay a single penny and that tutorials are very easy to get and understand because manuals are included which are usually named as README so be sure to RTFM (Read the F****** Manual).
Here are some tools which could be of use to you guys
Chkrootkit
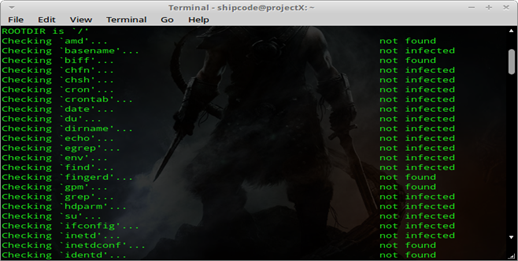
Chkrootkit or Check Rootkit is a common open source program or tool used for scanning rootkits, botnets, malwares, etc. in your Unix/Linux server or system. It is fully tested on: Linux 2.0.x, 2.2.x, 2.4.x, 2.6.x, and 3.x.x, FreeBSD 2.2.x, 3.x, 4.x, 5.x and 7.x, OpenBSD 2.x, 3.x and 4.x., NetBSD 1.6.x, Solaris 2.5.1, 2.6, 8.0 and 9.0, HP-UX 11, Tru64, BSDI and Mac OS X. This tool is pre-installed in BackTrack 5 under Anti-Virus Forensic Tools.
To install chkrootkit on a Ubuntu or Debian based distro, you can just type :
sudo apt-get install chkrootkit. |
To start checking for possible rootkits and backdoors in your system, type the command:
sudo chkrootkit. |
Here are other options you can use after issuing the command sudo chkrootkit -h:
-h show the help and exit
-V show version information and exit
-l show available tests and exit
-d debug
-q quiet mode
-x expert mode
-e exclude known false positive files/dirs, quoted, space separated, READ WARNING IN README
-r dir use dir as the root directory
-p dir1:dir2:dirN path for the external commands used by chkrootkit
-n skip NFS mounted dirs
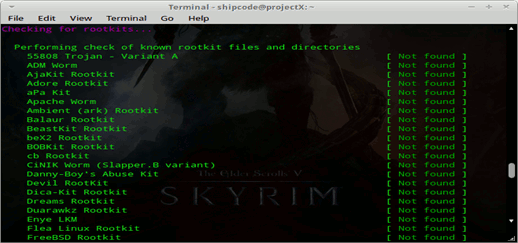
Rootkit Hunter
Rootkit hunter or rkhunter is an Open Source General Public License (GPL) Rootkit Scanner similar to chkrootkit which is also pre-installed in BackTrack 5 under Anti-Virus Forensic Tools. This tool scans for rootkits, backdoors and local exploits by running tests like: MD5 hash compare, look for default files used by rootkits, wrong file permissions for binaries, look for suspected strings in LKM and KLD modules, look for hidden files, and optional scan within plaintext and binary files.
To install rkhunter on a Ubuntu or Debian based distro, you can just type :
sudo apt-get install rkhunter.
To start the scanning in your file system, type the command:
sudo rkhunter –check.
And if you want check for updates, issue the command:
sudo rkhunter –update.
After rkhunter has finished scanning your file system, all the results are logged at /var/log/rkhunter.log.
Here are other useful options for rkhunter as shown in the -h flag:
–append-log Append to the logfile, do not overwrite
–bindir <directory>… Use the specified command directories
-C, –config-check Check the configuration file(s), then exit
–cs2, –color-set2 Use the second color set for output
–configfile <file> Use the specified configuration file
–cronjob Run as a cron job
–dbdir <directory> Use the specified database directory
–debug Debug mode
–disable <test>[,<test>…] Disable specific tests
–display-logfile Display the logfile at the end
–enable <test>[,<test>…] Enable specific tests
–hash {MD5 | SHA1 | SHA224 | SHA256 | SHA384 | SHA512}
Use the specified file hash function
–list [tests | languages | List the available test names, languages, checked rootkits | perl] for rootkits, or perl module status, then exit
-l, –logfile [file] Write to a logfile (Default is /var/log/rkhunter.log)
–noappend-log Do not append to the logfile, overwrite it
–nocf Do not use the configuration file entries for disabled tests (only valid with –disable)
–nocolors Use black and white output
–nolog Do not write to a logfile
–nomow, –no-mail-on-warning Do not send a message if warnings occur
–ns, –nosummary Do not show the summary of check results
–novl, –no-verbose-logging No verbose logging
–pkgmgr {RPM | DPKG | BSD | Use the specified package manager to obtain or SOLARIS | NONE} verify file property values. (Default is NONE)
–propupd [file | directory | Update the entire file properties database, package]… or just for the specified entries
-q, –quiet Quiet mode
–rwo, –report-warnings-only Show only warning messages
-r, –rootdir <directory> Use the specified root directory
–sk, –skip-keypress Don’t wait for a keypress after each test
–summary Show the summary of system check result
–syslog [facility.priority] Log the check start and finish times to syslog
–tmpdir <directory> Use the specified temporary directory
–unlock Unlock (remove) the lock file
–vl, –verbose-logging Use verbose logging (on by default)
-V, –version Display the version number, then exit
–versioncheck Check for latest version of program
-x, –autox Automatically detect if X is in use
-X, –no-autox Do not automatically detect if X is in use
ClamAV
ClamAV is a known open source anti-virus software in Linux. It is the most famous Linux anti-virus which has a GUI version now designed for detecting Trojans, viruses, malware and other malicious threats easier. ClamAV can also be installed in Windows, BSD, Solaris and even in MacOSX. Fellow security researcher Dejan Lukan has a detailed tutorial here in InfoSec Institute Resources page on how to install ClamAV and how to work with its command line interface.
BotHunter
BotHunter is a network-based botnet diagnosis system which tracks the two-way communication flows between your personal computer and the Internet. It is developed and maintained by the Computer Science Laboratory, SRI International and available for Linux and Unix but now they have released a Private Test Release and a Pre-Release for Windows.
You can download this software here. You could also check its addon which is called BotHunter2Web.pl. This addon converts BotHunter infection profiles into web pages, which can be viewed through your browser directly or via private webserver. BotHunter infection profiles are typically located in ~cta-bh/BotHunter/LIVEPIPE/botHunterResults.txt.
Sample Usage for BotHunter2Web.pl:
perl BotHunter2Web.pl [-date YYYY-MM-DD] -i sampleresults.txt
Additional Options and Switches:
-h — help message
-date YYYY-MM-DD — [or TODAY, YESTERDAY]. Blank = build one massive table
-i FILE — BotHunter profile file (e.g., botHunterResults.txt)
-wl <filename> — A list of victim IPs you wish to surpress from the HTML table
-outdir <path> — Output Directory(default = current dir)
-MaxEvents N — Max number of event entries per row
-MaxCC N — Max number of CC entries per row
-lookup — Perform nslookup on victim IP
avast! Linux Home Edition
avast! Linux Home Edition is an anti-virus engine offered free of charge but only for home and not for commercial use. It includes a command line scanner and based on my experience it detects some of the Perl IRC bots I have been collecting like w3tw0rk’s modified IRC (Internet Relay Chat) bot (originally made by Pitbul) that contains malicious functions like udpflood & tcpflood functions and allows its master or bot controller to execute arbitrary commands with the use of the system() function for Perl.
You can download this antivirus software here.
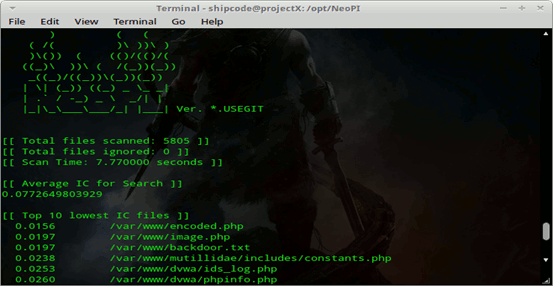
NeoPI
NeoPI is a Python script which is useful for detecting obfuscated and encrypted content within text or script files. The intended purpose of NeoPI is to aid in the detection of hidden web shell code. The development focus of NeoPI was creating a tool that could be used in conjunction with other established detection methods such as Linux Malware Detect or traditional signature or keyword based searches. It is a cross platform script for Windows and Linux. Not only does it aid users to detect possible backdoor shells but also malicious scripts like IRC botnets, udpflood shells, vulnerable scripts, and other malicious stuffs.
To use this Python script, just checkout the code in its official github site and navigate through its directory:
git clone https://github.com/Neohapsis/NeoPI.git
cd NeoPI
Then we use the -h flag to see the options for running the script:
shipcode@projectX:/opt/NeoPI$ sudo ./neopi.py -h
Usage: neopi.py [options] <start directory> <OPTIONAL: filename regex>
Options:
–version show program’s version number and exit
-h, –help show this help message and exit
-c FILECSV, –csv=FILECSV generate CSV outfile
-a, –all Run all (useful) tests [Entropy, Longest Word, IC, Signature]
-z, –zlib Run compression Test
-e, –entropy Run entropy Test
-E, –eval Run signature test for the eval
-l, –longestword Run longest word test
-i, –ic Run IC test
-s, –signature Run signature test
-S, –supersignature Run SUPER-signature test
-A, –auto Run auto file extension tests
-u, –unicode Skip over unicode-y/UTF’y files
Based on the options above, if we want to run all tests like Entropy, Longest Word, IC, Signature and run auto file extension tests in the /var/www directory, we can just issue the command:
sudo ./neopi.py -a -A /var/www
If you want to generate a CSV outfile for future references, we can use the command:
sudo ./neopi.py -C outfile.csv -a -A /var/www
Two security researchers (Scott Behrens and Ben Hagen) here in InfoSec Institute and the original developers of the NeoPI project have also written a detailed tutorial entitled ‘Web Shell Detection Using NeoPI‘ which explains Entropy, Longest Word, IC, Signature and other useful tests.
Ourmon
Ourmon is a Unix-based open source program and a common network packet sniffing tool in FreeBSD but it can also be used for detecting botnets as explained by Ashis Dash in his article entitled ‘Botnet detection tool: Ourmon‘ in Clubhack Magazine or Chmag.
Grep
And the last but not the least, we have the grep command which is a powerful command-line tool in Unix and Linux. It is used for searching and probing data sets for lines that matches a regular expression. As a short history, this utility was coded by Ken Thompson on March 3, 1973 for Unix. Nowadays, Grep is known for detecting and searching for pesky backdoor shells and malicious scripts too.
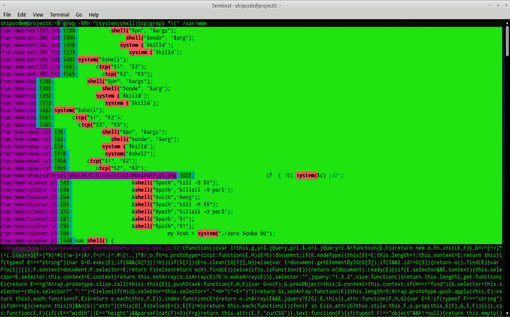
Grep can also be used for detecting vulnerable scripts (e.g the PHP function shell_exec which is a risky PHP function that allows remote code execution or command execution). We can use the grep command to search for the shell_exec () function as our advantage in our /var/www directory to check for possible PHP files that are vulnerable to RCE or command injection. Here is the command:
grep -Rn “shell_exec *( ” /var/www
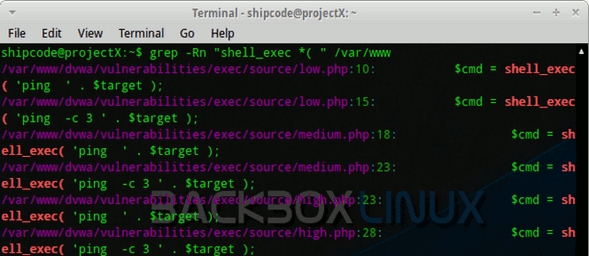
Backdoor shells commonly use the shell_exec function for executing arbitrary commands. Aaside from shell_exec function, most PHP backdoor shells also use functions like base64_decode, eval, phpinfo, system, php_uname, chmod, fopen, fclose, readfile, edoced_46esab, and passthru.
Thus you could also easily grep these functions:
grep -Rn “shell_exec *(” /var/www
grep -Rn “base64_decode *(” /var/www
grep -Rn “phpinfo *(” /var/www
grep -Rn “system *(” /var/www
grep -Rn “php_uname *(” /var/www
grep -Rn “chmod *(” /var/www
grep -Rn “fopen *(” /var/www
grep -Rn “fclose *(” /var/www
grep -Rn “readfile *(” /var/www
grep -Rn “edoced_46esab *(” /var/www
grep -Rn “eval *(” /var/www
grep -Rn “passthru *(” /var/www
In my recent researches, most Perl IRC botnets use common Perl functions like shell, system, and tcp so we can actually grep these functions just like hunting or detecting PHP backdoor shells. Thus, if we want to scan our /var/www directory again then we could just issue the commands below:
grep -Rn “shell *(” /var/www
grep -Rn “tcp *(” /var/www
grep -Rn “system *(” /var/www
Grep is such a good tool for manual detection and forensic analysis :).
References:
http://www.cyberciti.biz/faq/howto-check-linux-rootkist-with-detectors-software/https://github.com/Neohapsis/NeoPIhttp://www.bothunter.net/bothunter2web.html
http://resources.infosecinstitute.com/open-source-antivirus-clamav/
http://pentestlab.org/hunting-malicious-perl-irc-bots/
http://blog.rootcon.org/2012/04/simple-kung-fu-grep-for-finding-common.htmlhttp://resources.infosecinstitute.com/web-shell-detection/
Popular Posts:
- None Found
![]()