Guest post by Kerry Blake
We love Linux and we love it for its open source nature, security, and powerful tools. There are a lot of free as well as commercial VPN solutions available for Ubuntu. We are not going to list or rank all the top VPN providers. We don’t necessarily want to rank them simply because users choose their VPN provider based on their personal requirements. If you want an US VPN service, you should look for the best US VPN service that supports OpenVPN. The intent of the article is to help newbies configure and use their favorite VPN service without going back and forth in Ubuntu community forum and embarrass oneself before the rather patronizing users.
Prerequisites
A computer that runs Ubuntu. In general this guide should work also for other GNU/Linux distributions, but some examples and commands are specific for Ubuntu
You should probably know how to use the terminal. Don’t worry if you are relatively new to Linux. We are not going to paste some long-tailed obscure code in the terminal and run them heedlessly. We will be using only simple terminal commands to install the require package or restart the network manager.
You should also choose a reliable VPN service depending on your need. If you want unrestricted access to content on the Internet that are restricted only to users in the U.S. You should probably buy a US VPN.
VPN protocols available
There are several VPN protocols one can choose from. Using the built-in Network Manager VPN could be set up on a Linux machine without much trouble. Most of the VPN solutions for Ubuntu or Linux in general work with OpenVPN.
L2TP/IPSec – This might be as secure as OpenVPN. However, you might find it hard to configure it on Ubuntu and many of its flavor. You could also see a lot of raging discussions about this on Ubuntu support forums.
PPTP – This protocol is quite popular among Windows VPN clients. It is not very secure and the main reason for its popularity around the globe especially on Windows-based machines is its ease of installation. If you needed an US VPN, you can use services from Switch VPN (or your favorite VPN service) and you have got yourself a cheap VPN service.
OpenVPN – This is the most popular VPN protocol used in most of the Linux machines. Most importantly it is supported by almost all VPN service providers. The main reason OpenVPN is favorite among the geeky Linux community is because it highly secure, reliable and pretty fast. OpenVPN is considered more of a standard.
How to setup VPN in Ubuntu
A lot of VPN providers have user-friendly clients that one can download and install on their computer. Since they use OpenVPN protocol, you can also configure VPN on your Ubuntu machine with the help of the default Network Manager directly without installing the client.
Step 1: First of all you need to install OpenVPN package for Ubuntu. This is done by using the following terminal command. You will have to present your password to become root.
sudo apt-get install network-manager-openvpn openvpn |
Even if you are on a fairly slow Internet connection it won’t take you more than a few minutes for the installation to complete.
Step 2: Once the installation of the package is complete you need to restart the native network manager. You can restart the network manager using any of the 2 following methods.
Method 1: Using terminal
Use the following terminal command to restart the network manager.
https://help.ubuntu.com/community/UsingTheTerminal
sudo restart network-manager |
Method 2: Simply restart your computer or log off and login again.
Step 3: Now you will need the OpenVPN configuration file of the VPN provider you have subscribed to. Visit their website and look for the configuration file that will have an extension “.ovpn” and extract it to a location that is easy for you to access, because we will need the details in the configuration file later.
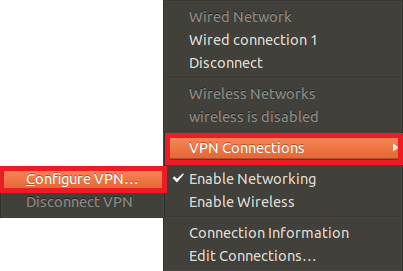
Step 4: Open Network Manager which is denoted by arrows on the Ubuntu taskbar on the top right corner. From the dropdown menu choose “VPN Connections” and then click on “Configure VPN.”
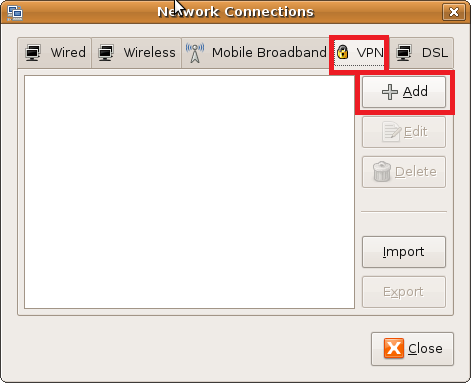
Now you will see a Network connection window.
Make sure the tab “VPN” is selected and click on “Add” as shown in the image below.
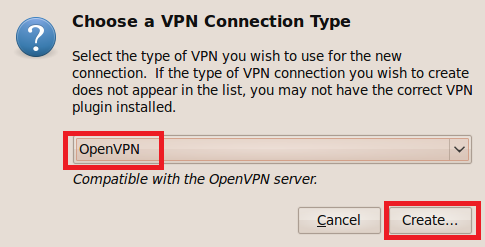
Step 5: In the new window choose OpenVPN from the drop down and click on Create. If you don’t see OpenVPN in the list below you do not have the correct VPN plugin installed and you might have to repeat the above steps again carefully.
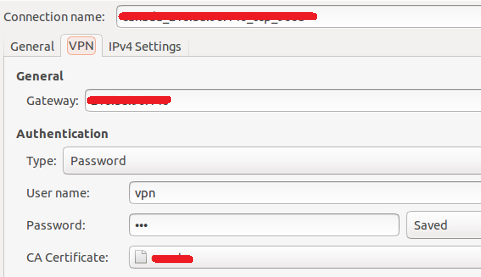
Step 6: In the new window enter the address of the VPN server in the “Gateway” field. This address will be given to you by the VPN provider. Under Authentications type choose, “Password” and enter your username and password provided by your VPN provider. Now click on “CA certification” field and navigate to the folder where you have extracted the OpenVPN config files you have downloaded from your VPN service provider. Finally click save to save your settings.
Step 7: That’s it! You have successfully configured your favorite VPN service with network manager in Ubuntu. Whenever you want to use the Internet using VPN, you need to click on the network manager icon on the taskbar and choose the name of your VPN connection. If VPN is active you should find a small padlock on the network manager icon.
Finally, choose your VPN provider wisely. If you are serious about your VPN connection and your online privacy you will have to subscribe to you a reliable VPN service and stay away from free VPN providers which are not that secure and reliable.
Popular Posts:
- None Found
![]()
Great writeup! All VPN services I’ve tried have had a How-To Guide for Linux, but sometimes they’re not all that great.
A tip it you can’t get it working: Don’t keep your certificates for your connection on an ENCFS encrypted folder/drive. Weird “bug” but I tell you, it had me trying for Weeks before I figured it out. You can’t connect if you do.
Thank you Erik, I’m glad that you like the article and find it useful.
I can’t get a open vpn set up because I get stuck at the CA certificate as I don’t know where to get that or even what it is. Please explain how to get the file in the type that requires I am using xubuntu 14.04 64 bit.
Hey cmcanulty,
there could be several issues so it’s hard to say at the moment.
Try to check info given on this URL http://ubuntuforums.org/showthread.php?t=2217944.
Let us know if you manage it to work.
I am really glad that i found this tutorial after having troubles setting up VPN on my Ubuntu server. Everything went perfect. Thank you.
I tried to use this for my other Debian based server, but since it has no GUI i couldn’t complete the installation. Luckily i found this great article http://goo.gl/J2VzUE which helped me a lot.
Thank you Rick for sharing another helpful resource.
Good for kids