 I came across by chance in what I consider one of the more comprehensive guide to creating audio in Linux, and Stefano gave me the permission to republish his material that I consider really good and that he uses as musician.
Stefano it’s an Ubuntu user and his guide it’s based on this distribution, he’s really active in the Ubuntu italian community, if you want to make him a question regarding his guide, you can post in this thread http://forum.ubuntu-it.org/index.php/topic,278719.0.html, the language of the forum is Italian, but i’m sure that you’ll get some answers also if you ask kindly in English.
You can find part 1 of this tutorial here
This is part 2, i plan to republish the whole guide in 4 parts in the next days.
The original article is in italian, if you have any comment about the translation, contactme.
5. Soundfont in wavetable
If you have a Creative Labs Sound Blaster sound card or one that supports the “Wavetable” (go here to see if it has this function: http://www.alsa-project.org/main/index.php/Matrix:Main) you can load soundfont directly into the memory of the sound card, eliminating the need to use Qsynth and other things that I ‘ll explain later.
If wavetable is not available or you have a 64-bit system, skip to step 6 a .
Otherwise, install asfxload:
sudo apt-get install awesfx |
If you want to use it just open the console and write:
asfxload /usr/share/sounds/sf2/ |
soundfont_name
Or if you want to always have them automatically available in Rosegarden go into settings and click “Load startup sound fonts”, put asfxload as a command and /usr/share/sounds/sf2/ soundfont_name
For example:
asfxload /usr/share/sounds/sf2/Unison.sf2 |
or:
asfxload /usr/share/sounds/sf2/PC51f.sf2 |
Do not bother to do this with the fluid-soundfont because they are huge and far beyond the capabilities of your poor Sound Blaster.
You can put one of the commands above in System → Preferences → Applications startup, to load the sounds on startup.
NB : Due to an annoying bug in the chip of the old SoundBlaster hardware, asfxload does not work on 64-bit versions of operating systems .
6. Jack
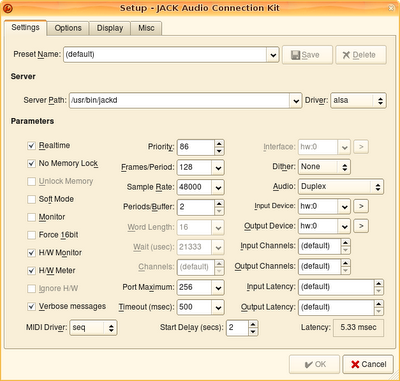
Now we are ready to work for real. Everything is under Applications → Sound & Video: First of all call Jack Control and click on “Setup “. With the parameters that you see in the picture it works for me very well, but feel free to try others. A word of advice: for this and other programs always set the frequency to 44100 if you want to make only music, but if you do things that will be synchronized to the video on a DVD that is being created, use 48000 in this and all other programs
NB: the parameters on the screens below are related to my system, but yours might be very different. You must not copy the settings and then go straight on the Ubuntu forums to ask why it doesn’t work. You must read all this paragraph, understand Jack and how it works and adapt it to your configuration.
![Schermata-JACK Audio Connection Kit [(default)] Started. Schermata-JACK Audio Connection Kit [(default)] Started.](http://linuxaria.com/wp-content/uploads/2011/03/Schermata-JACK-Audio-Connection-Kit-default-Started.1.png)
Jack is the heart of the whole system. It enables you to synchronize all your applications and act as super patch-bay. Let me explain: Windows usually has a very expensive business suite that does everything (Acid, Cubase, Sonar, etc.). A project you do with one or another of these suite, is not easily, or indeed is impossible to be ported to another suite. This sounds like a good thing – everything seems easier – but it is actually very restrictive: you are stuck in the modus operandi of a single suite (the one that you have bought bleeding dry) and so often it’s possible to understand right away from the first musical notes if a musician uses this or that program. The only freedom you have consists of the plugin (VST). With Linux, however we have many programs that deal with many different things. Rosegarden for MIDI, Ardour for music, for the drum machine we have Hydrogen, etc., all synchronized by Jack. But if we like to use MusE instead of Rosegarden, no problem.
We direct to all the software to use Jack as a clock, and pressing “Play” in any application, all others will start in sync.
Jack is also a huge patch-bay. Imagine having a professional audio recording studio: you’ll have dozens and dozens of tools, appliances, mixer, effects, and so on. You’d become mad to connect all the cables every time: it’s much better to connect all the instruments and effects in a single device, that you’ll setup with various configurations.
This device, whose work is to connect “everything with everything” in various configurations, is commonly called a “patch bay” and Jack has this function: it connects the output of a software to the input of another, an effect from a software to the input of another , from the microphone to an application, the exit of the mixer to the speakers of another software or another application, and so on.
It can also operate directly from within Ardour. Later we will see some practical examples.
Clicking on “Options” you can set these. Basically you have to act on these parameters:
Driver – If you have an external adapter card set this on the external driver. In all other cases must be set to “ ALSA “.
Realtime – This is selected only if you use the RT kernel . On maverick (Ubuntu 10.10) this can also be selected without the RT kernel.
No memory lock – It should be checked. Deselect this option only if you have problems.
Soft mode – This parameter allows you to leave jack continue working after many xruns (“beats” lost, a symptom that the system does not work properly, the source of disturbances and interruptions in the audio). You should clear it, at least when you record.
Monitor – If selected, Jack also creates two ports – “alsa pcm monitor” as input. used to record everything you hear , in essence. I don’t use this because I am just confused and I’d rather prefer to have more control in what goes into my sound card and what comes out with alsamixer and nothing else.
Force 16bit – Select this only if your card does not support any other bit rate. In general, leave unchecked, and select it only if you have problems.
H /W Monitor – This should always be selected because it is a great function but it’s available only in a few sound cards. If your sound card doesn’t support it, simply is not going to use it. So you can leave it selected.
H /W Meter – As above
Verbose messages – It should be checked, so Jack gives you more explanations if something goes wrong.
MIDI driver – To be set as “ seq , except for rare cases of some MIDI keyboards that require “raw” to be recognized..
Priority – “default” should be fine. If, however,you are using some “tweak” with the RT kernel to improve performance (see Appendix E ), this parameter can vary.
Frames/Period – This is the most important parameter . Start with highest values, and start Jack (if it starts, otherwise try to resolve the problem changing the others parameters) then put values lower, until you begin to see the xrun (the green numbers under “Started” turn red and begin to rise from zero). Stop it, increase the value and reboot Jack until you no longer have xrun (at least until they appear not too often: let’s say that 1 every quarter of an hour is acceptable). You can see Jack latency grow and decrease in the lower right window of the options depending on how you have changed this parameter. Generally, on a good card and a good system this settles down to 128 or 256. On low cards (all those built-in for example) or systems with little performance (including the Pentium 4 or Duron or worst processors) or poorly supported you go to 1024 or 2048. So, to be sure, you start with 2048 . Then go to 1024 if it works, and so on until it gives too much xrun.
Sample rate – 44100 if you are working on a CD. 48000 if you are working on the audio of a DVD. However, even if you have made the wrong choices, if you use Ardour, you can export all at the frequency that you need.
Periods/Buffer – This depends on your sound card. Select the lowest possible value that let Jack start. is generally “2” .
Dither – None ” this should improve performance, but I never found any improvement in the quality of the audio by setting this differently. Probably depends on the sound card.
Audio – Duplex “is essential, otherwise you can not record while you listen. Of course there is the case that you have a sound card so low that does not support the duplex, in which case the advice is to immediately throw it away and buy something decent.
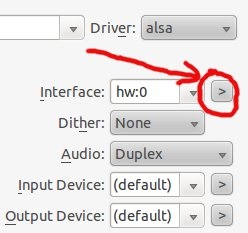
Interface – If you have more than one card this is the parameter that allows you to choose which sound card to use with Jack : press “> ” (next to “Interface”, on the right) and select the correct sound card, the one you want to use with Jack. To view “Interface” you have to put on “Default” both “Input Device” and “Output device” .
The other parameters are negligible.
In the options, go also to “Misc”and select:
– Start JACK audio server on application startup
– Enable system tray icon
– Start minimized to system tray
– Save JACK audio server configuration
– Enable ALSA sequencer support
7. Soundfont in Qsynth
Let’s see how to simulate an entire station of music, an orchestra in practice, one of those things that you connect to your PC to make sounds (such as, for example a small device like a questo or even a keyboard-synthesizer) and the effects on these sounds, to be used with any software as MIDI machine . Or all the bands we want, at the same time.
7.1 – Configuration
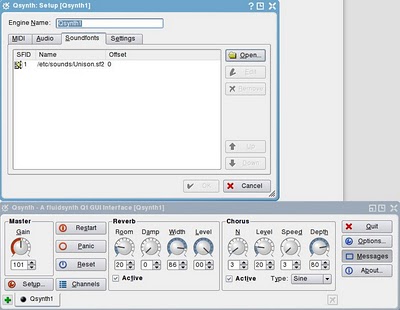
You can also put a long list but it will use only the one on the top of the list. I have also noticed some bizarre behavior in some versions of Qsynth, so I recommend that you leave only one line:
Moving in the other settings we’ll have this configuration (verify the frequency in the case of video):

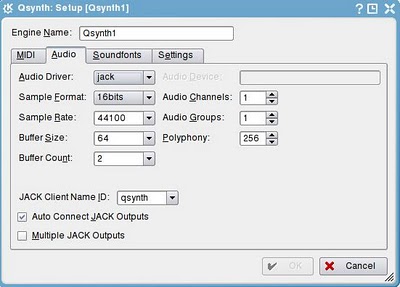
7.2 – Run multiple instances of Qsynth
Qsynth allows you to have multiple banks of sounds simultaneously, as if you have a lot of synth keyboards, or many MIDI machines at your disposal as you want (memory permitting).
To do this:
– Press the key green “+” in the lower left.
– this opens up the options window, so click on “Soundfonts”
– load the soundfonts that you want.
You can add as many instances as you want, but watch the memory of the PC . Later (section 13.3) we will see how to use these instances in Rosegarden.
8. Soundfont in Timidity
Timidity pretends to be a sound module, as Qsynth with soundfonts, it is more difficult to configure (you have to change a text file by hand) and often has much more latency than Qsynth. It is essentially a zero software. So why use it? Simple: in systems with a slower CPU and a ridiculous sound card, hacking Timidity in the configuration file you can disable many functions and make MIDI – albeit of poor quality – audible even on those systems. It’s the equivalent of the “Microsoft GS Wavetable, ” the thing that makes you feel the Windows MIDI (in an obscene manner) even without setting up anything, but you can not change (the only way to have a better sound on Win is to buy a VST module, such as the Edirol HyperCanvas, and play MIDI files only through technology supporting VST).
Timidity is therefore the best option for those who do not want to record, for those who only use the audio to listen to midi file or doing karaoke, or have an old computer.
You should keep all: Timidity, Qsynth with some soundfont and wavetable (if your sound card supports it) with other soundfont. This way you can always choose the output you want, in any program that supports MIDI. Just go into settings (somehow there are always settings in programs that use MIDI) and set what MIDI Machine you want to use. In some programs like Rosegarden (that is a MIDI sequencer) you can choose which MIDI machine to use for each track (Qsynth, the wavetable, Timidity, any MIDI keyboard connected to the outside …) and to use which instrument of this machine..
To install Timidity just the usual:
sudo apt-get install timidity |
This also install “freepats”, which in practice are soundfonts, unfortunately horrible so let’s change them.
To do this we open the file timidity.cfg:
sudo gedit /etc/timidity/timidity.cfg |
Comment out the line “source/etc/timidity/freepats.cfg” and add the path and name of the soundfont you want to use, for example with our soundfonts PersonalCopy, so in the end the file becomes:
# Disabling some of the Midi Controls can help with the CPU usage a lot. # The same goes to the VLPF, sample anti-aliasing and effects such as # reverb and chorus # By default, try to use the instrument patches from freepats: #source /etc/timidity/freepats.cfg soundfont /usr/share/sounds/sf2/PC51f.sf2 |
Obviously change PC51f.sf2 with the soundfont you like among those we have seen before. But beware: the larger the soundfont, the worse timidity will work on a slow PC and will behave in an unpredictable way.
Save, and then restart Timidity:
sudo /etc/init.d/timidity restart |
On Karmic this can give you an error and not return the prompt to the console: do not worry, just press CTRL + C and everything will work. Now listen to the song with new sounds. To listen you can use any MIDI player (see the ‘ Appendix A ), telling to the player to use Timidity as a MIDI device.
Finally, we change some options for Timidity that run on slow CPU or sound cards that are not very efficient. If you hear bad noise or slowdowns during playback, reopen the file:
sudo gedit /etc/timidity/timidity.cfg |
You see that there is a section of things to activate if you have a slow CPU. Sampling, effects, and so on. Try disabling something (remove the “#” line), save the file and restart Timidity:
sudo /etc/init.d/timidity restart |
Listen and decide if the relationship between quality and efficiency is good. If not, disable something else, and go on.
Another trick is to start Timidity with higher priority. When it works – and does so rarely – it makes everything go smoothly, but the probability that the system crashes completely and even freezes all is quite high. So take care
For the record – and just for the record! – You can increase the priority of Timidity in this way:
Close as many programs as possible, including the MIDI player. Then, stop Timidity:
sudo /etc/init.d/timidity stop |
Then restart it with high priority:
timidity --realtime-priority=70 -iAD -B2,8 -Os1l -s 44100 |
Reopen the MIDI player and cross your fingers.
To go back on these stps, close the player and kill timidity:
killall timidity |
Restart the old Timidity with:
sudo /etc/init.d/timidity start |
And use Ctrl+C if it doesn’t return to the prompt.
9. LADSPA effects
If you use Ardour (multitrack audio recorder), you can skip this step and go directly to step 10. Ardour allows you to add effects in cascade before or after the fader for each track.
If you do not use Ardour and want to use Rosegarden with everything, that still has a primitive management of audio, then you will want to record some effect, the voice for example, or on the guitar.
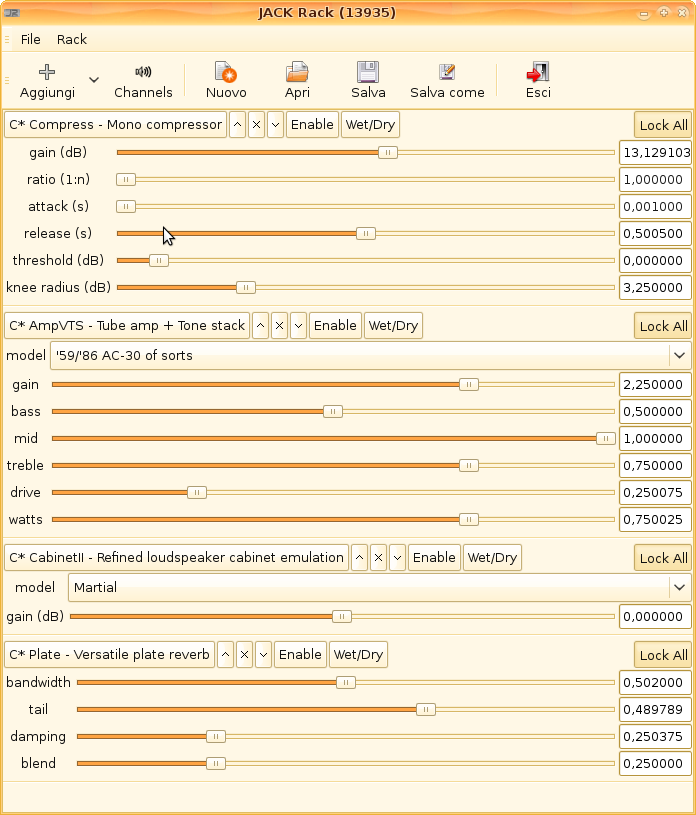
Here Jack Rack comes to our help. It’s very intuitive and works just like a real multi-effects rack. A great setting for an electric guitar is, for example:
(can be found by pressing ‘Add’ in Jack Rack)
– Amplitude → Dynamics → Compressors → C* Compress
– Simulators → C* AmpVTS
– Simulators → C* CabinetII
– Simulators → Reverbs → C* Plate
To connect these effects to Rosegarden or other programs, we will use Jack.i’ll Give an example below, paragraph 11. But before we must load other programs.
10. dssi-vst
VST are plugins, many of them free, designed for Windows, but very compatible with Linux through wine.There are some beautiful ones, that sound really good.On Linux they are the equivalent, known as “LADSPA” as we have seen above, which are even better (or higher quality?) than the VST but suffer the terrible problem of being completely without a preset.. And to manually configure all the effects, as should be the job of a real audio engineer, is a horrible and hallucinating task for the beginner. If you are familiar with Windows VST, or if you have bought some very expensive one as Guitar Rig or AmpliTube, you can still use it on Linux.
Once installed, dssi-vst allows you to click with a VST (usually has the extension .dll) and get it started working perfectly inside Jack.
If you do not have Ubuntu 10.10 (Maverick Meerkat) you have to compile Ardour with VST support, or use VSThost (to be compiled too). These two cases are quite complex and a bit unstable. It also does not work on 64-bit versions.
I left out the two older guides, one for each method. If you do not have Ubuntu 10.10, if you have a 32-bit version and want to experience the thrill of these two methods, here are the guides:
– VSThost
– ArdourVST
If you have Ubuntu 10.10 do this:
– If you have not yet installed it, do this now:
sudo apt-get install dssi-vst |
– create in your /home folder vst (all lower case) where you’ll keep all your VST
– install a number of VST on your system. You must know a little on how to use wine, of course. Some VST are not even installed, they are just a copy of the .dll in the folder where you keep all VST. When you install the VST from the setup program, at some point it asks you where you keep the plugin, and you must set that folder.
– Go to System → Preferences → Main Menu.
– Click on “More” and then “New Entry”
– Type: Application – Name: VSTHOST – Command: vsthost %f
– Click “Close” and again “Close”
– Launch Jack, Ardour, Rosegarden and everything you want
– Navigate into the folder where you keep all the VST and locate the .dll file of the VST you want to run.
– With the right select “Open with other application”, deselect “Remember this application …” and choose VSTHOST from the list.
The VST should start with its beautiful interface, and appear among the inputs and outputs of Jack, ready to be plugged.
You can also use the VST directly from Ardour and Rosegarden, like they were a normal LADSPA effect. But On Ardour you can not select the preset and you do not see the graphical interface. On the other hand Rosegarden works perfectly, but only for the effects: the VST instruments crash the system.
This is the End of Part 2 of this guide on how to produce Music with Linux, stay tuned for the next 2 parts.
Thanks to Hans for the proofreading.
And thanks once again to Stefano Droghetti for this guide.
[amazon_enhanced asin=”1886411344″ price=”All” background_color=”332610″ link_color=”FFFFFF” text_color=”D4CE99″ /]
[amazon_enhanced asin=”1593272707″ price=”All” background_color=”332610″ link_color=”FFFFFF” text_color=”D4CE99″ /]
Popular Posts:
- None Found
